
If you are looking for ways on how to soundproof a finished room, then you will be interested in these tricks and tips I am about to share with you.
We all know how annoying those unwanted noises can make. They could cause us to lose our concentration on what we are currently doing.
If these noises actual are interfering with our sleep, it can cause a lot of sleep related illnesses.
With lots of sound pollution around us today, a lot of new technologies and products are been developed to control the level of noise we are been exposed to. As exposure to sound as high as 90 dB for a long period can affect our hearing over time.
Since the room you are looking to soundproof is already built out, I won’t talk about how it should have been soundproofed during construction.
However, these tricks and techniques here will help you to soundproof any room you want to reduce noise entering or leaving it.
Soundproofing a Room That is Already Built
You can soundproof the room yourself or with a friend by taking it as a DIY project. Using a company or professional to do it for you will definitely cost you thousands of dollars.

If you wish to do it yourself, it will involve some work on your part but in the end, you would have learned something new and save some bucks.
Personally, I soundproof all the rooms in our home. I wish to share my soundproofing methods with you.
1 . Caulk and Seal Door Gaps
Interior doors have some of the biggest gaps in the room that could be letting in or out the sound. Identifying these gaps and sealing them will improve your soundproofing efforts.
Seal the door frame with acoustic caulk with a caulking gun. The frames can be pass to sound in or out of the room. So. when it is caulked and sealed, since sound travel by air or by impact, the sound cant easily pass through the gap.
The way to soundproof the frame is to apply the acoustic caulk in between the layers of the door frame and drywall/cement. The caulk will completely seal the gap and prevent any sound from leaking through.
Caulking, while requiring a little more work than a temporary seal, is incredibly effective. It adds mass around the perimeter of the door and makes it much harder for sound to travel through the material.
The other part of the door that is also having gaps in the door jamb. The part that ensures your door is held securely. This part can also be another pass for sound to easily get into the room.
Thanks to this door jamb seat kit, you can easily seal off this part effectively.
2 . Seal Gaps in Windows
The second part of any room besides the door where you will find gaps is the window. The borders around the window can be seal with a window adhesive strip which will cover up any crack or gap and block out any sound trying to get in.
Thicker material tends to work best here, and installation is very easy. Just peel off the adhesive covering and push it against the window border.
This window silicone weatherstripping tape does a good job. Plus, it is transparent.

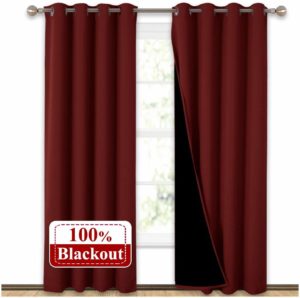
3. Hang Sound Deadening Curtains or Honeycomb Blinds
Soundproof curtains have multiple uses besides just absorbing sound. They also block out light, dust and the sun from getting into the room.
These curtains come in different colors and sizes. Therefore, it will be up to you to choose colors that compliment the room decor. It is advisable to get one that will cover the window from top to the floor.
This way, the curtain will be able to block out th sound. Liners and curtains are made from thick material and are designed to effectively block noise. Installation is easy and you can open the curtain at any time if you want to hear outside.
Just like the curtains, honeycomb blinds can also help in blocking sound. Get the ones that are thick for they will do a good job.
Honeycombs will let in some little bit lights than the curtains. So if you don’t want to hang curtains, then, the blinds will be another option to consider.
4. Add Extra Mass to the Walls
Thicker walls and heavier walls with greater mass are typically soundproof than their thin counterparts. Most America home walls are made with drywall.
So, another good way to soundproof existing wall is to add a second layer of drywall over the existing interior walls to increase the thickness and weight of the wall.
The way that you do this is to add a layer of green glue dampening compound on the existing wall and to reinforce the soundproofing efforts, add some mass loaded vinyl mat on top of the green glue.
After adding the vinyl mat, then add the drywall as a layer on top of that with nails, staple or use the green glue to hold drywall.
You can now paint the drywall your room color.
Recommended products:
5. Add Acoustic Foam Panels
Acoustic foam panels just like the green glue, the drywall or the vinyl mat can be added to any part of the room. These foams come in different sizes and colors and are used for different parts of the room.
You will find some to use for your window, the door, the ceiling, and the walls.
Acoustic foam wedges are affordable and effective soundproofing foam. can easily add these soundproofing foams to the walls by sticking them. Some of these foams are self-adhesive that you just stick to the wall.
But not all of them have adhesive on them, in that case, you will have to purchase the adhesive separately. I used these foam wedges and they worked well for me. here is a detailed article on how to soundproof a room wall.

6. Soundproof the Ceiling by Soundproofing the Floor Above If Possible
Soundproofing a ceiling is probably the most difficult task in soundproofing a room. Because not only is tricky to put stuff up in ceiling but getting up there requires a ladder or high strong table to climb.
If you live in your own home, it’s probably better to put some carpets and floor underlayments on the floor above. This will effectively soundproof the ceiling below. This way, you don’t have to soundproof the room ceiling again.
The way you can do this is to get a heavy thick carpet for floors and placed it on the floor to cover all areas and even with a bit against the wall.
To make soundproofing the floor more efficient, if it is a wooden floor, you can lay a floor underlayment first before the wood.
The other way is you get a rubber floor mat and a mass loaded vinyl mats, place them on the floor first.
These are both sound dampers and absorbers. When the sound is finding its way through the existing floor, the soundwaves will be absorbed before they get to the room.
After that, now use the carpet to cover them up by placing it on top of them.
But let’s say your home is not having a second floor or you live in an apartment where you have no control over the floor above. Then you will have to look into adding some ceiling soundproof materials. Read here some easy ways to soundproof an existing floor.
7. Level Up with Some Soundproofing Materials
Soundproof curtains and blankets can be used on the walls, windows, and doors. Just like a soundproof foam, you can also use a soundproof blanket on the ceiling.
If you will wish for something colorful and better looking than the blanket, then the soundproofing foam will be better.
Soundproofing foam is a great product. It”s designed to absorb sound so that it stops echoing while making a room much quieter.
Another benefit is that it”s easy to install, even on ceilings. While you will find many designs, such as wedges, egg crates, and pyramids, they are all effective at soundproofing.
You can also use styrofoam ceiling tiles on the ceiling to achieve a similar effect of reducing noise. The best part of the ceiling tiles is that they have the advantage of preserving the ceiling by giving it the color and style you want.
Ceiling tiles are designed to be in different shapes and styles. They give the ceiling an esthetically appeal while doing the work of absorbing echoes. I used these Styrofoam Ceiling Tiles on one of my projects and they worked well.
8. Drop the Ceiling if You Can
In dropping the ceiling you won’t have to touch the existing ceiling at all. The way you do this is by lining L-shaped channels around the perimeter of the walls just a few inches under the existing ceiling.
These L-shaped metals are meant to hold your grid. So you have to place them where you will like the grids to be.
NB: it is not recommended to build a ceiling that is less than 7.6 feet tall.
When you have finished placing the L-channels, then you will install T-channels to complete the grid. Use a wire to hang the construction off the hook screws in the ceiling.
After this, examine the grid to ensure it is secure. Then start to put your ceiling panels. You can even place some acoustic foam panels for ceilings on it. The gap between the two ceilings will cause any sound to disperse.
want to implement the drop the ceiling technique in your finished room, here is a video that will walk you through the entire process from start to finish
9. Re-arrange the Room
Using your room decor to your advantage can be an effective way to soundproof the room. Not will you reduce the level of sound in the room, but you will be adding beauty to the room.
Some ways you can use your furniture and decorations to your advantage are:
- Push your wardrobe, bookshelves and other furniture with sturdy wooden backgrounds against the wall. Just be sure to leave a gap between the wall and the furniture to reduce vibrations.
- You can decorate the room with sofas and textiles. You can hang blankets, quilts, curtains, and other materials in the room where suitable.
- Place sound makers like the TC, speakers, etc at the part of the room where sound won’t bound.
Sometimes, all you need to make a room quite is to just rearrange the furniture in the room and nothing more. So if the room already has existing furniture, then you just need to rearrange them.
Final Thoughts on How to Soundproof a Finished Room
Soundproofing a room can be an existing project that if you don’t take caution when you start you can keep going. So be sure you have a limit.
All the techniques above on how to soundproof a finished room are effective. However, it will depend on whether you own the room or you are renting it.
If you own the property, then you are free to implement any or all the techniques outlined above including dropping the ceiling or add extra mass to the existing wall.
However, if you are renting the space, it will be better you implement the non-invasive soundproofing techniques instead. Because techniques that will punch holes and stuff on the walls and ceiling might not be a good idea if you are renting. unless you are willing to repair the place and get rid of everything when you are leaving.
Nonetheless, if you don’t have the permission to alter part of the room because you are renting. Its probably better you stay clear of certain techniques.
Things like hanging soundproof blankets and curtains, sealing cracks and gaps in doors and windows are good options for you.
I hope you found this post helpful in your soundproofing journey.
For any questions, suggestions, and clarifications, you can leave a comment below and I will do my best to reply to you within a reasonable time.

- How to Chew Quietly While Eating-Effective Tips - April 14, 2023
- Why is My Clutch Pedal Squeaking – Causes & Fixes - April 14, 2023
- Propane Tank Making Hissing Noise (Solved) - February 25, 2023